

The magic ring (or magic circle) is the secret to starting circular crochet projects without leaving a hole in the center. Essential for hats, coasters, and amigurumi, it can be tricky for beginners. This guide breaks down three easy methods to master the magic ring, complete with step-by-step text directions.
Materials & Tools Required
To follow along with this project, you will need the following materials:
- **Yarn:** Medium weight yarn.
- **Hook:** Size H-8 (5.0 mm) hook.
- **Skill Level:** Beginner / Intermediate.
Stitch Abbreviations & Guide
Before beginning, review these common abbreviations used throughout the pattern:
- **MR:** Magic Ring
- **CH:** Chain
- **SC:** Single crochet
- **SL ST:** Slip stitch
Step-by-Step Instructions
Follow these detailed instructions to complete the project. Keep your stitch counts consistent!
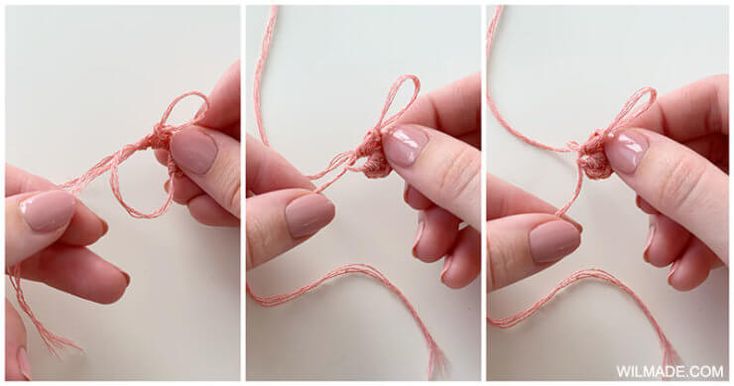
Method 1: The Classic Cross Method
Pro Tips for Success & Pinterest Styling
Secure the Tail: Always weave in your magic ring tail end securely in both directions using a needle, or the circle may open up when washed.
Pinterest Share: A visual stepbystep breakdown of the ‘X’ loop is a massive search query on Pinterest. Highly recommend creating a graphic for this.
Frequently Asked Questions
Q: Why is my magic ring not pulling closed?
A: Make sure you are crocheting over both the loop AND the tail. If you miss the tail, it won’t slide to close.
Q: What is an alternative to the magic ring?
A: You can Ch 4, join with a Sl St to form a ring, and work your stitches into that ring (though it leaves a small hole).
Conclusion
Mastering this project is a wonderful milestone in your crochet journey. Once you finish, be sure to pin it on Pinterest to save it for your next crafting session and share your beautiful results with the community! Happy crocheting!


")
