

Tired of messy knots and visible jumps when changing colors in your crochet projects? Learning how to make clean color changes is the easiest way to elevate your work from homemade to professional. This guide covers changing colors at the end of rows and in the middle of a stitch.
Materials & Tools Required
To follow along with this project, you will need the following materials:
- **Yarn:** Two contrasting colors of yarn.
- **Hook:** Corresponding size hook.
- **Skill Level:** Beginner / Intermediate.
Stitch Abbreviations & Guide
Before beginning, review these common abbreviations used throughout the pattern:
- **YO:** Yarn over
- **SC:** Single crochet
- **DC:** Double crochet
Step-by-Step Instructions
Follow these detailed instructions to complete the project. Keep your stitch counts consistent!
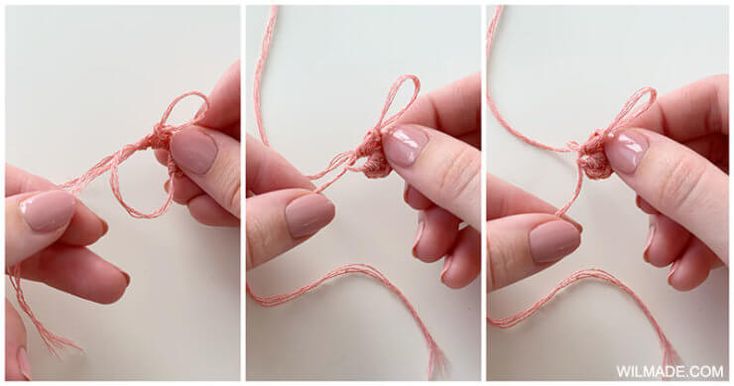
Method 1: Changing Color at the End of a Row
Method 2: Changing Color in the Middle of a Row
Pro Tips for Success & Pinterest Styling
Carrying Yarn: If you will be switching back to the first color soon, you can lay the unused yarn along the top of the stitches and crochet over it to carry it along.
Pinterest Share: A visual graphic showing the ‘final pullthrough’ with the new yarn loop is the most effective way to explain this technique.
Frequently Asked Questions
Q: Do I need to tie knots?
A: Knots can fail and create hard bumps. It is much better to weave in the tails securely with a tapestry needle.
Q: What do I do with the tails?
A: Leave a 6-inch tail for both colors, and weave them into the stitches of their respective colors.
Conclusion
Mastering this project is a wonderful milestone in your crochet journey. Once you finish, be sure to pin it on Pinterest to save it for your next crafting session and share your beautiful results with the community! Happy crocheting!


")
