

Looking to make your very first crochet garment? This free crochet cardigan pattern is designed specifically for beginners. With zero complex shaping, a simple construction made of rectangular panels, and basic stitches, you can create a cozy, stylish cardigan that looks like it came from a high-end boutique. This project is highly visual, looks amazing in photos, and is perfect for sharing on Pinterest!
Materials & Tools Required
To follow along with this project, you will need the following materials:
- **Yarn:** 5 to 7 skeins of Category 4 (Medium/Worsted Weight) yarn (e.g., Lion Brand Heartland or Heartland Tweed) approx. 1,200 1,500 yards.
- **Hook:** Size J-10 (6.0 mm) crochet hook or size needed to obtain gauge.
- **Notions:** Tapestry needle, scissors, and 4 locking stitch markers.
- **Skill Level:** Absolute Beginner.
Stitch Abbreviations & Guide
Before beginning, review these common abbreviations used throughout the pattern:
- **CH:** Chain stitch
- **SC:** Single crochet
- **HDC:** Half double crochet
- **ST(S):** Stitch(es)
- **SL ST:** Slip stitch
- **YO:** Yarn over
Step-by-Step Instructions
Follow these detailed instructions to complete the project. Keep your stitch counts consistent!
Step 1: The Back Panel
Step 2: The Two Front Panels (Make 2)
Step 3: The Sleeves (Make 2)
Step 4: Seaming and Assembly
Pro Tips for Success & Pinterest Styling
Gauge Check: Ensure your stitches are loose and elastic. If your panel is too stiff, try going up a hook size.
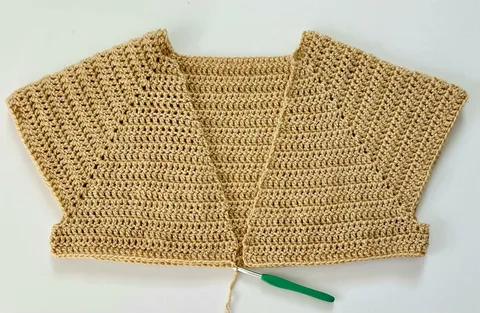
Pinterest Styling: Take a flatlay photo of the cardigan panels before seaming to show the easy construction. Fold it nicely with a cup of coffee or yarn skeins in the background for a highly clickworthy Pinterest pin!
Frequently Asked Questions
Q: What is the best yarn for a beginner cardigan?
A: Acrylic or wool blends are ideal because they have great stretch, wash easily, and don’t split as you work.
Q: How do I adjust this cardigan for larger sizes?
A: Simply chain more stitches for the back panel (increase by multiples of 4) and add more rows to the front and back panels to increase length.
Conclusion
Mastering this project is a wonderful milestone in your crochet journey. Once you finish, be sure to pin it on Pinterest to save it for your next crafting session and share your beautiful results with the community! Happy crocheting!


")